Working with Event Platforms
Paminga integrates with the event platforms you already use to run webinars. Connect one and your webinars flow into Paminga as Events, your forms and automations register contacts straight into the webinar, and registrants and attendees are tracked back in Paminga automatically — no exports, no spreadsheets.
Every event-platform integration behaves the same way once it's connected, and that shared workflow is what this page covers. The only part that differs by platform is the connection itself:
Webinars Become "Events" in Paminga
Create your webinars in your event platform as you normally would. Paminga discovers them automatically and syncs each one in as an "Event" — name, start and end time, status, and the registration URL. New webinars appear on their own, and changes you make in the platform are picked up on the next sync.
Finder Integration
Organize your Events in Paminga's Finder.
Create a folder to hold every asset related to your event, then edit your Event and add it to that folder.
Add Your Event to a Finder Folder

Personalization via Event Tokens
Events housed in the Finder automatically expose their properties as Folder Tokens.
Don't type your event's name into an email or landing page — use the folder token instead. Edit the event's name later and every email and landing page updates automatically. The same applies to the registration URL, start and end date/time, and more.
Invite Contacts to Register
Paminga gives you several ways to drive registrations for your webinars.
Email Drip Series
Open the Finder, right-click the folder that contains your event, and create a new Drip Series in it.
- Create emails that invite contacts to register
- Build them inside the event's Finder folder — better yet, a child folder for invitations
- Use folder tokens to inject the event's name, date/time, and registration URL so your emails stay correct if details change
- Send them via a Drip Series at whatever cadence you choose
- Shape the audience with the Segment Builder
- Add a Goal that removes contacts the moment they register and moves them into your reminder series
CTAs on Your Website
Create one or more CTAs to promote your webinars on your site. Right-click your event's Finder folder and create the CTA there.
Don't miss Event Listings
Event Listings are dynamically generated lists of upcoming events that update on their own as events are added to Paminga.
- Add an Event Listing to any CTA or Landing Page
- Filter by category, date, and more — publish different listings by topic or geography
Event Listing Element

Social Posts
Schedule social posts that drive prospects to your registration landing page.
Register Contacts Straight Into Your Event Platform
This is where the integration earns its keep: a contact who registers through Paminga is registered in your event platform too, automatically.
Add an Event Registration element to a form, or a Register for Event action to a form or automation. Point it at one of your synced webinars.
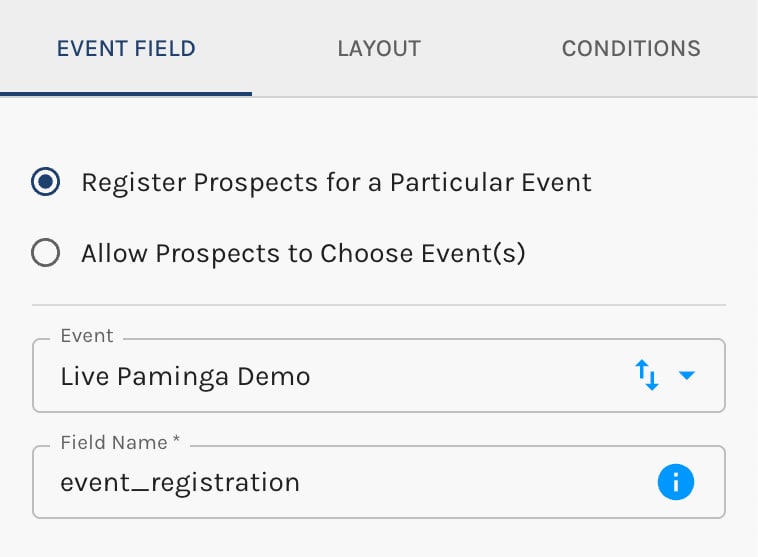
The Event Registration element can:
- Register the contact for a specific event you choose, or
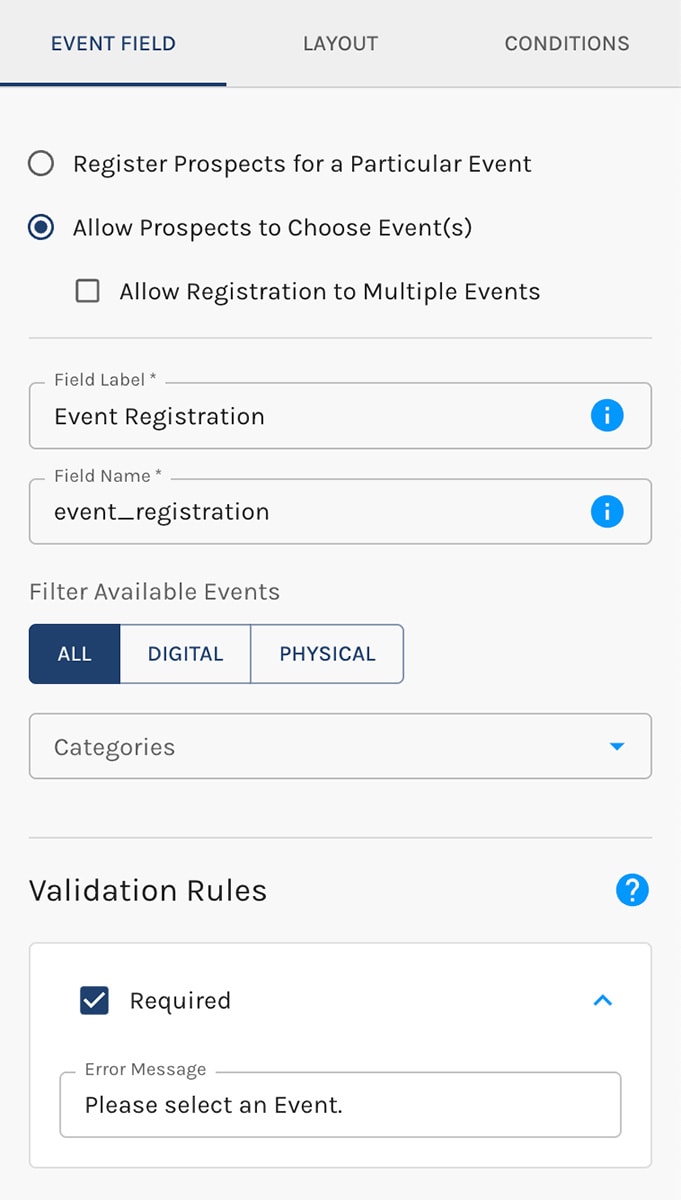
- Let the contact pick which event to register for (a searchable drop-down)
Register for a Particular Event
Allow Prospects to Choose Events
When the contact submits, Paminga registers them in both Paminga and your event platform and captures their unique, personalized join URL — so a contact who registers on your site never has to register again on the platform's. Re-registering the same person doesn't create a duplicate.
Publish Your Form Anywhere
- Embed your form into any web page (as a
<div>, not an iframe) - Add it to any Paminga Landing Page
- Add it to any Paminga CTA — personalized section, banner, sidebar, or popup
Registration From the Platform Counts Too
Registrations that happen on the event platform flow back into Paminga the same way. However a contact registers — your form, your automation, or the platform's own registration page — they show up as a registrant in Paminga, and they qualify for the "Did Register for the event named [This Event]" condition everywhere the Segment Builder appears.
Viewing Registrants
Double-click your event in the Finder to open the Event Details screen. Use the three tabs at the upper left:
- Details
- Registrants — view (and export) everyone who has registered
- Attendees
Create an Event Registration Landing Page
Right-click your event's Finder folder and create your landing page there. Add your registration form to it, and use tokens to inject the event's name, date/time, and registration URL so the page updates automatically if details change.
Event Registration Confirmation
Right-click your event's Finder folder and create an email that confirms the contact's registration. Use tokens for the event's details so the confirmation stays accurate over time.
Event Reminder Drip Series
Right-click your event's Finder folder and create a reminder Drip Series.
- Create reminder emails in that folder (a child folder for reminders is even cleaner)
- Use tokens for the event's name, date/time, and registration URL
- Build the audience from contacts who have registered (available as a segment condition)
- Send them via a Drip Series at your chosen cadence
When the Webinar Is Over
Paminga syncs attendance from your event platform automatically. Each attendee is recorded against the event, and a contact who attended qualifies for the "Did Attend the event named [This Event]" condition in the Segment Builder.
Viewing Attendees
Open your event's Event Details screen and click the Attendees tab to view (and export) everyone who attended.
Thank Attendees
Right-click your event's Finder folder and create an email to thank everyone who attended. Use tokens for the event's details.
Registered But Did Not Attend
Create a "Sorry We Missed You" email for the contacts who registered but didn't show — segment on registered-but-not-attended and send it from the event's folder.
Never Registered
Create a "See What You Missed" email for contacts who never registered, and let them know what's coming next.