Dynamics Solution Package
What is in the Installation Package?
When you upload the installation package to your Dynamics Instance, you gain visibility into Paminga through iFrames.
Those iFrames allow you to see things such as a Contact’s activity history and even unsubscribe them from email communications right from your Dynamics account! Below are the details of each of the iFrames and additional dashboards that are installed with this package!
Contact/Lead iFrame
The Contact iFrame gives you visibility into specific data points about a particular contact, the ability to send an email to that contact, and the ability to perform a few other actions.
The specific data points are listed below:
- Lead Score: This will be the lead score that is associated with the default overlay in your account
- Paminga Lead Source: Also known as the traffic source
The functionality of the iFrame include:
- Activity Stream Tab: Just like on the contact detail page within Paminga, you will be able to see the contact's full activity history
- Lead Score Tab: On this tab, you will be able to manually adjust the lead score of the particular contact right from Dynamics
- Unsubscribe Tab: Here you can check on the contact's unsubscribe status, and even opt them out of emails should you need to
- List Membership Tab: On this tab you will be able to see all of the lists that this contact is a member of. You can add or remove contacts from lists right from this tab as well
- Subscriptions Tab: Just like on the list membership tab, you will have visibility into the subscriptions that a contact is a part of. You can add or remove contacts from subscriptions right from this tab as well
- Sync This Contact Button: If you are making manual edits to a contact within Dynamics, such as updating a last name, and you would like that information to be in Paminga ASAP, you can hit the “Sync This Contact” button on the iFrame to automatically push that data to Paminga
Account iFrame
The Account iFrame allows you to see specific data points about the contacts that are associated with a particular account. Data points such as most recent activity, and the amount of visits in the last 30 days.
The functionality of the iFrame include:
- Account Activity: This tab will show you the 10 most recent activity entries for the contact’s that are associated with this account
- Send Trackable Email: If the contact is a known contact in Paminga, you will have the ability to send a trackable email right from the account iFrame
- Sync This Contact: You will be able to sync specific contacts to Paminga from this iFrame
- Sync This Account: You will be able to sync an entire account to Paminga by selecting this button on the iFrame
Hot Leads Breakdown
The Hot Leads Breakdown dashboard will be installed on the Home tab of your Dynamics instance. If you are the assigned lead owner to contacts in Paminga you will see the following about those contacts:
- Most Active Visitors
- Top Lead Scores
- Recent Activity
In addition to having that information visible, you are also able to apply a segment to this dashboard.
Interested in seeing recent activity for your leads that live in Colorado? Log in to Paminga, create a segment that qualifies contacts who are located in Colorado – then pop back over to your Dynamics instance and apply that segment to this dashboard. BOOM! All the recent activity for your assigned leads in Colorado.
Funnel Vision Dashboard
Just like the Hot Leads Breakdown, the Funnel Vision Dashboard shows specific data points about your assigned leads.
You can access this dashboard by selecting the Paminga tab that will be in the top navigation of your Dynamics instance.
The Funnel Vision Dashboard gives you visibility into the following data points:
- Who’s Hot: This tab lets you see the hottest contacts. By default, the data is sorted with the highest lead score at the top. You can filter the results by different Lead Scoring Overlays
- Prospect Activity: This tab allows you to see the various activity that your prospects have particpated in. You can filter this information by date range, domain group and lead score overlay
- Anonymous Visitors: This tab shows you the same information as the Prospect Activity tab, but only for anonymous contacts. This means we do not have their information yet. Once we collect their information, they will show up on the Prospect Activity tab
- My Emails: This tab gives you insight on on the emails you’ve sent through Paminga or Dynamics and the stats on them
Integration Setup
Setting up the Dynamics and Paminga integration is straightforward and easy. You’ll need to have a few credentials handy + the installation package.
Credentials Required
- Dynamics Location (On Premise or Online)
- AccessURL
- Discovery Service URL
- Organization Unique Name
- Dynamics Username : This needs to be a user with read access on users & read/write access on other modules
- Dynamics Password
Setup Directions
Once you have the Dynamics Installation package, you’ll need to follow these easy steps to get everything up and running!
Install the solution into Dynamics
- Log into Microsoft Dynamics. Navigate to Settings Solutions Import
- Browse to the location you saved the solution .zip file and double click the .zip file
- On the next screen click the Next button
- On the next screen click the Import button
- A progression window will be displayed, when it finishes click the Close button
- Now the solution should be visible indicating it was installed
Once the package is installed:
- Log into Microsoft Dynamics. Navigate to Settings Security Users
- If you are using Microsoft Dynamics 2013 or earlier the Navigation is Settings Administration Users
- Click on your user record to edit
- Scroll to the bottom of the page and expand the Paminga Credentials area
- Enter your Paminga username and password
- Save the changes
Setup the integration with Paminga
- Log into Microsoft Dynamics. Navigate to Settings Customizations Developer Resources
- Gather the Organization’s Unique Name
- Gather the Discovery Service URL by clicking the link and copy the URL from the address bar
- Log into Paminga and navigate to Account (top right of the screen) Integration Settings Dynamics Integration
- Select the Version and LocationIf the location is On-Premise, your user’s active directory domain will be needed
- On-Premise instances must be setup with Dynamics IFD (Internet Facing Deployment) through ADFS (Active Directory Federated Services)
- Enter the Organization’s Unique Name and Discovery Service URL
- Enter your username, password and any Notification Recipients
- Click the Save button and a testing pop-up will be displayed
- The green indicator means the test was successful
- The red indicator means the test was unsuccessful. Verify the information entered and try again
Setup the OAuth Authentication
-
Hover over your email account username (in top right corner of the platform) and click on Account Settings. From here, select "Integartions" from the left hand navigation. Within the Dyanmics 365 option, select "Configure"
-
On the Dynamics Sync Setup OAuth page, your Access URL will already be filled in.
- Click Begin Auth to initiate the process, which will open a new tab in your browser where you will be prompted to sign into Dynamics instance.
- Sign into your dynamics instance using the account from your Paminga Integration setup page.
-
Once you sign in, click Accept on the Dynamics Permissions Requested notice prompt.
-
After you accept, you’ll be redirected to the Dynamics Sync Auth Response page in Paminga with a Token Success Message.
- Then you’re all set!
In Dynamics, test that the integration is working by navigating to FunnelVision through the Sales tab.
Navigating the Integration Setup Page
To get to the Dynamics Integration setup page within Paminga, you’ll need to navigate to your user in the right-hand corner -> Account Settings -> Integrations -> Dynamics “Configure”.
From there, you’ll see everything you need!
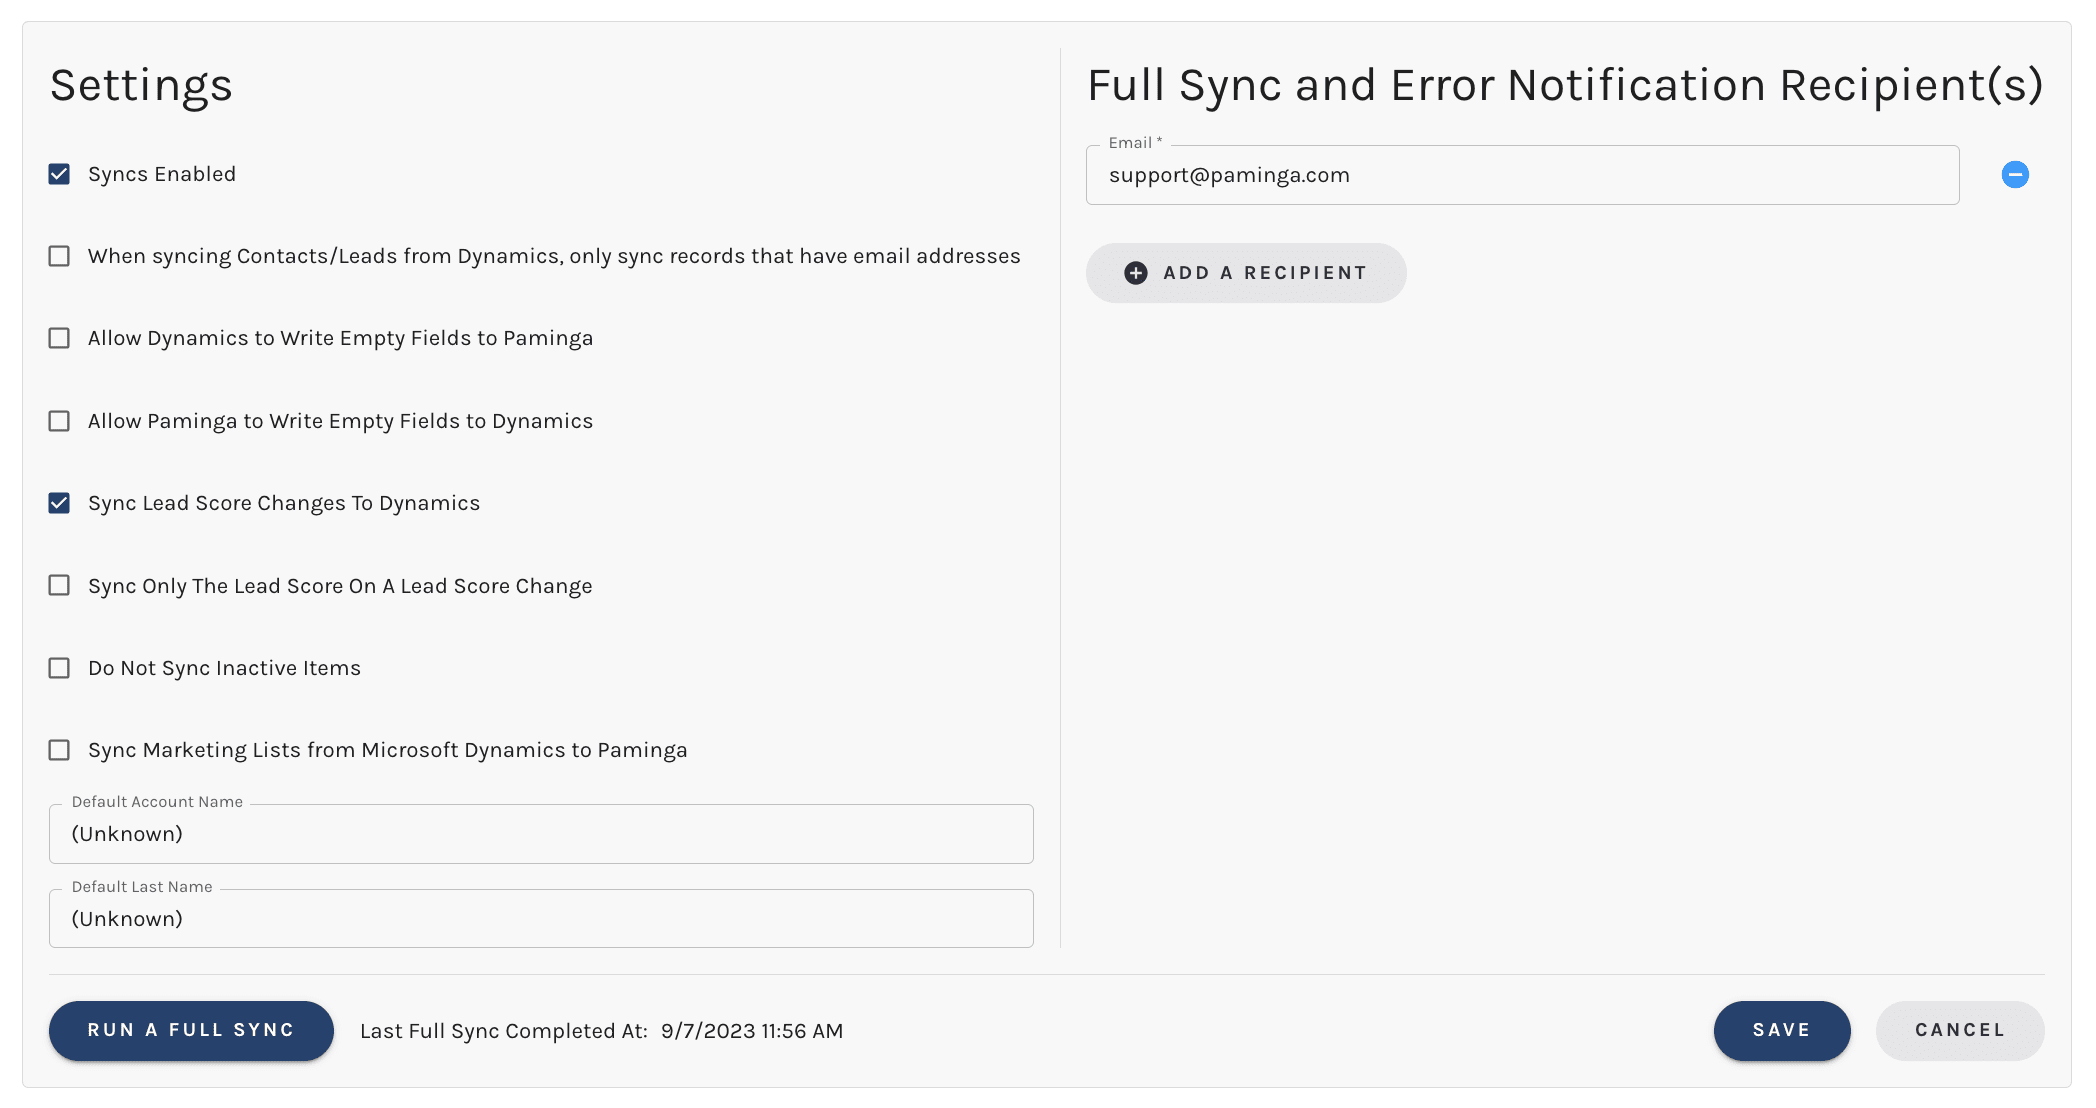
For quick reference, we’ve defined everything you’ll see on the page below:
- Syncs Enabled Checkbox: Must be checked in order for syncs to occur
- There is an area where you can choose who gets notifications when a Full Sync is complete and also any Error Notifications
- When syncing Contacts/Leads from Dynamics, only sync records that have email addresses Checkbox: An optional checkbox
- Allow Dynamics to Write Empty Fields to Paminga Checkbox: An optional checkbox giving Dynamics the ability to blank out fields in Paminga
- E.g in Paminga, my contact has a custom field of favorite dog with a value of Pug. In CRM, that field is blank. My contact record is modified & on the next down sync, the favorite dog field is blanked out because the favorite dog field is blank in CRM
- Allow Paminga to Write Empty Fields to Dynamics Checkbox: an optional checkbox giving Paminga the ability to blank out fields in Dynamics if the value is not present in Paminga
- Same stuff as above, just the opposite direction.
- Sync Lead Score Changes to Dynamics Checkbox: An optional checkbox
- Sync Only The Lead Score On A Lead Score Change Checkbox: An optional checkbox
- Only the lead score will be updated when a contacts lead score is changed. Without this box checked, all mapped information about that contact will be synced.
- Do Not Sync Inactive Items Checkbox: An optional checkbox
- Sync Marketing Lists from Dynamics to Paminga checkbox
- Default Last Name: For contacts/leads that do not have a Last Name. Last name is required and this prevents any sync errors
- Default Account Name: For contacts/leads that do not have an Account. Account is required and this prevents any sync errors
Once your settings have been selected and all your fields have been mapped, run a Full Sync to sync your data from your Dyanmics isntance to Paminga.